Hello, this is SBC Technology.
Recently, at the Google Cloud Next 2025 event, an innovative library called the Agent Development Kit (ADK) was announced. This toolkit integrates Google Cloud’s Gemini models and toolchains, allowing developers to easily create and run multimodal AI agents.
To understand ADK, you must first know what an Agent is.
An Agent is not just a simple conversational AI, but an intelligent component that can understand user requests, interact with external tools, and perform complex tasks. For example, it can handle tasks such as checking the weather, sending emails, summarizing documents, or calling APIs through tools. This Agent collects necessary information while conversing with the user and independently determines appropriate actions accordingly.
ADK provides the core components for creating such Agents. It includes the following features:
- Model Selection: Ability to specify various models such as Gemini 1.0 Pro, 1.5 Pro, 2.0 Flash, etc.
- Tool Integration (Tooling): Ability to register Python functions or external APIs as tools for the Agent to execute
- Multimodal Support: Support for various input methods such as text, voice, and images
- Web UI or CLI Interface: Provides an environment for easily testing the Agent
As such, ADK is a toolkit focused on building an “execution system of intelligent functional units”, unlike existing chatbots or simple LLM-based apps.
In this post, we will introduce the basic usage of the library with reference to the ADK official documentation (https://google.github.io/adk-docs/get-started/quickstart).
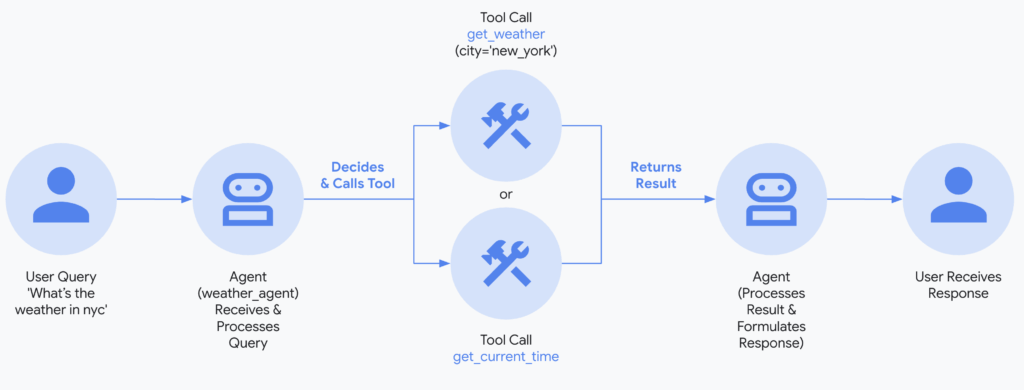
This demo will be configured with the following architecture to check the weather and time of each city.
The documentation assumes a local IDE environment with Python 3.9 or higher installed. The environment setup will not be described separately. For reference, we proceeded with the work in the Windows command prompt and file explorer.
To use Gemini, you must first create a project in the GCP console. If you are new to GCP, you can receive $300 in free credits. Please refer to the document below to complete the GCP project creation (payment account connection required), Vertex AI API activation, and Google Cloud CLI setup.
First, let’s create a virtual environment. If you do not do this, you may have difficulty installing the library due to conflicts with the existing environment.
$python -m venv .venv (Create .venv virtual environment)
$.venv\Scripts\activate (Activate virtual environment)

If the virtual environment is activated normally, the virtual environment name is displayed in the UI.
Now, let’s install ADK, the core library, using the $pip install google-adk command.
While installing, create a multi_tool_agent folder in the working directory in the file explorer, and then create __init__.py, agent.py, and .env files. For stable authentication, I created a service account and added Editor permissions for the project in IAM. After that, I created and added the sa_key.json file. Please refer to the documents below for detailed instructions.
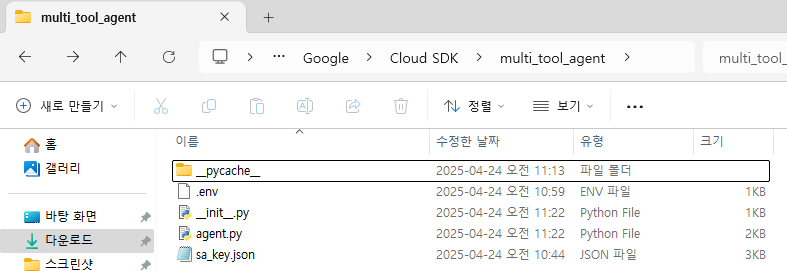
The contents of the written files are as follows.
[.env file]
GOOGLE_GENAI_USE_VERTEXAI=TRUE
GOOGLE_VERTEXAI_USE_LIVE_API=TRUE
GOOGLE_CLOUD_PROJECT=Your GCP project name
GOOGLE_CLOUD_LOCATION=us-central1 (or the connected region name)
GOOGLE_APPLICATION_CREDENTIALS=C:\Users\USER\AppData\Local\Google\Cloud SDK\multi_tool_agent\sa_key.json
[__init__.py file]
from . import agent[agent.py file]
import datetime
from zoneinfo import ZoneInfo
from google.adk.agents import Agent

def get_weather(city: str) -> dict:
    """Retrieves the current weather report for a specified city.

    Args:
        city (str): The name of the city for which to retrieve the weather report.

    Returns:
        dict: status and result or error msg.
    """
    if city.lower() == "new york":
        return {
            "status": "success",
            "report": (
                "The weather in New York is sunny with a temperature of 25 degrees"
                " Celsius (41 degrees Fahrenheit)."
            ),
        }
    else:
        return {
            "status": "error",
            "error_message": f"Weather information for '{city}' is not available.",
        }


def get_current_time(city: str) -> dict:
    """Returns the current time in a specified city.

    Args:
        city (str): The name of the city for which to retrieve the current time.

    Returns:
        dict: status and result or error msg.
    """

    if city.lower() == "new york":
        tz_identifier = "America/New_York"
    else:
        return {
            "status": "error",
            "error_message": (
                f"Sorry, I don't have timezone information for {city}."
            ),
        }

    tz = ZoneInfo(tz_identifier)
    now = datetime.datetime.now(tz)
    report = (
        f'The current time in {city} is {now.strftime("%Y-%m-%d %H:%M:%S %Z%z")}'
    )
    return {"status": "success", "report": report}


root_agent = Agent(
    name="weather_time_agent",
    model="gemini-2.0-flash",
    description=(
        "Agent to answer questions about the time and weather in a city."
    ),
    instruction=(
        "You are a helpful agent who can answer user questions about the time and weather in a city."
    ),
    tools=[get_weather, get_current_time],
)
Next, connect to the project using the $ gcloud init command. At this time, it is recommended to connect to the us-central1 region, which supports the Live API.
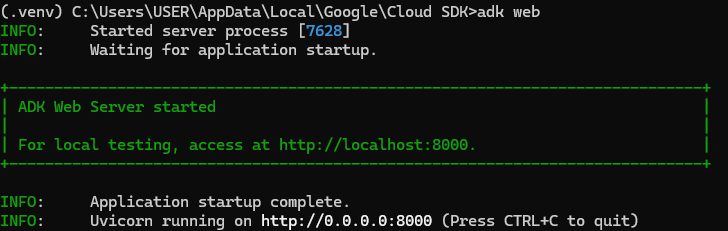
Now you are ready to use ADK. Run the adk web command in the working directory (the parent folder of multi_tool_agent).
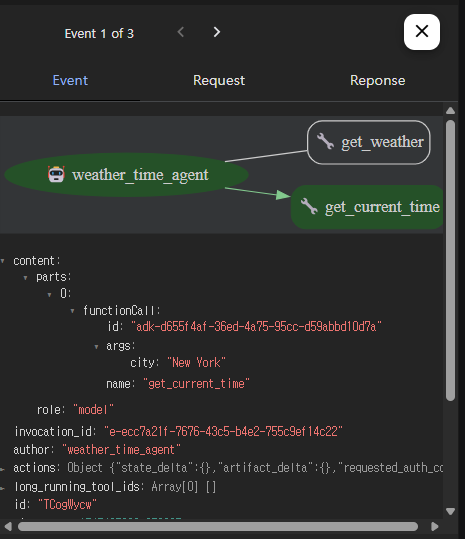
Now, if you access http://localhost:8000 in your browser, you can communicate with the Gemini model in the web UI. The following is an example screen of selecting multi_tool_agent in the upper left corner and calling the time Agent.
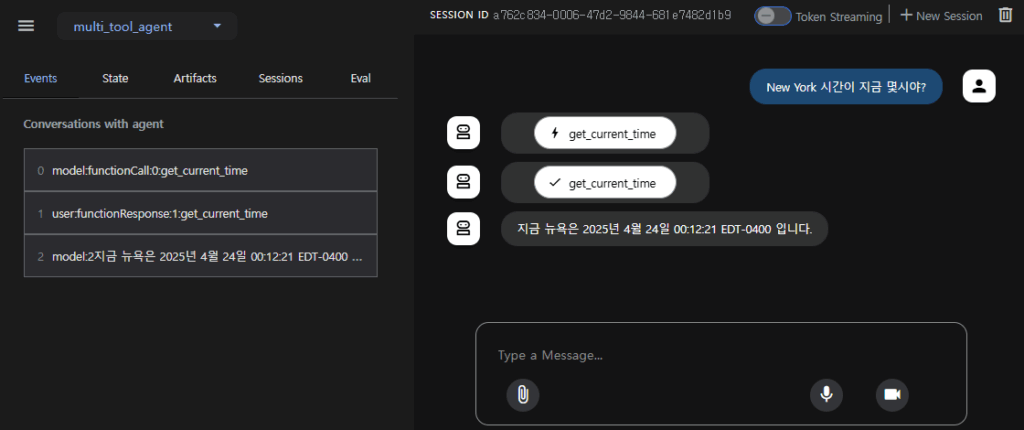
Clicking on an event allows you to view the details of each event.
Currently (as of April 24, 2025), it seems that the Live function (communication through real-time voice and video) has not yet been publicly released for the gemini-2.0-flash model. If you want to utilize the Live function, you must change the model name to gemini-2.0-flash-live-preview-04-09. However, if you use this model, text input is disabled, so please select the model according to your purpose. We expect that this part will be updated in the future so that text and Live functions can be used with the gemini-2.0-flash model alone.
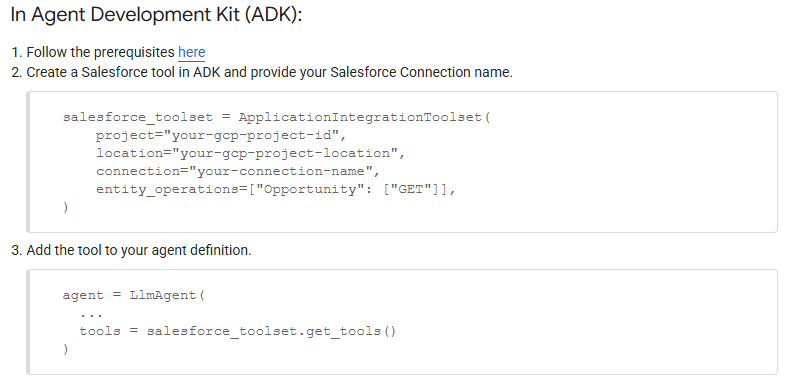
You can check the list of other available agents in the Agent Garden. For example, if you search for the Salesforce agent, the following description will appear.
As such, ADK makes it easy to build and deploy a multi-agent environment. ADK is gaining great popularity due to its web-based UI and seamless integration with Google Cloud, voice/video interaction through Live API, and easy multi-agent scalability.
In the future, ADK is expected to be increasingly used as a core platform for rapidly prototyping AI services and leading to practical deployment.
Thank you.

Comments are closed.